Easy Step-by-Step Guide on How to Install Solar Panels on Your Roof — Without Ever Worrying About Leaks
Introduction
If you’ve been Googling how to install solar panels because you want lower energy bills without an unexpected waterfall in your attic, you’re in the right place. After almost a decades of helping homeowners go solar, I’ve seen every leak-inducing mistake imaginable—wrong bolts, skipped flashing, even forgotten sealant (yes, really). In this guide, I’ll walk you through a leak-proof installation process that balances DIY savings with professional-grade waterproofing. You’ll learn:
-
The exact prep steps that stop leaks before they start
-
A proven, 10-step mounting method that keeps shingles intact
-
Waterproofing tricks roofers swear by (but rarely publish)
-
Maintenance habits that protect both your panels and your warranty
- How to Avoid Roof Leakage After a Solar Rooftop Installation
By the end, you’ll know how to tackle the job confidently—or how to supervise a contractor so nothing leaks on your watch. Ready? Let’s harness the sun and keep the rain out.
Why Roof Leaks Happen With Poor Solar Installations
Hidden Water Paths You Can’t Ignore (how to install solar panels)
Most leaks develop months—sometimes years—after panels are up. The culprits are almost always fasteners driven through shingles without a weather-tight seal or flashing plates that were misaligned. Once water slips under the roofing membrane, capillary action pulls it right into the decking and, eventually, the living space below.
The “Expansion-Contraction” Trap
Roofs expand under hot sun and contract at night. If rails are over-tightened or L-feet are installed off-center, those tiny movements tug at lag bolts, widening penetrations. A drop of water today can become full-blown rot next monsoon season.
Pre-Installation Checklist: Build Leak Prevention Into Your Plan
1. Structural & Roofing Health Check (how to install solar panels)
-
Age of Roof: If shingles are 15 + years old, replace them before installing. Panels last 25 years; your roof should too.
-
Decking Integrity: Walk the roof; note any “soft” spots. Replace rotten plywood—panels amplify loads.
-
Truss & Rafter Spacing: Compare to manufacturer rail spans. Undersized framing may need blocking or purlins.
2. Permits, Codes & Insurance (how to install solar panels)
-
Apply for local building and electrical permits. Inspectors focus on fire setbacks and wind uplift values.
-
Notify your homeowners’ insurer. Some require proof of professional torque settings on lag bolts.
3. Tools & Materials (how to install solar panels)
| Category | Must-Have Items | Leak-Proofing Purpose |
|---|---|---|
| Layout | Chalk line, stud finder | Positions rafters accurately |
| Drilling | 13 mm socket, 6 mm metal bit | Clean, exact pilot holes |
| Mounting | Stainless steel lag bolts (A2-70), L-feet, aluminum rails | Corrosion-free anchoring |
| Flashing | Form-fitted aluminum flashing, high-temp butyl tape | Diverts water away |
| Sealants | UV-stable tri-polymer sealant (e.g., GeoSeal), roofing mastic | Long-term waterproof cushion |
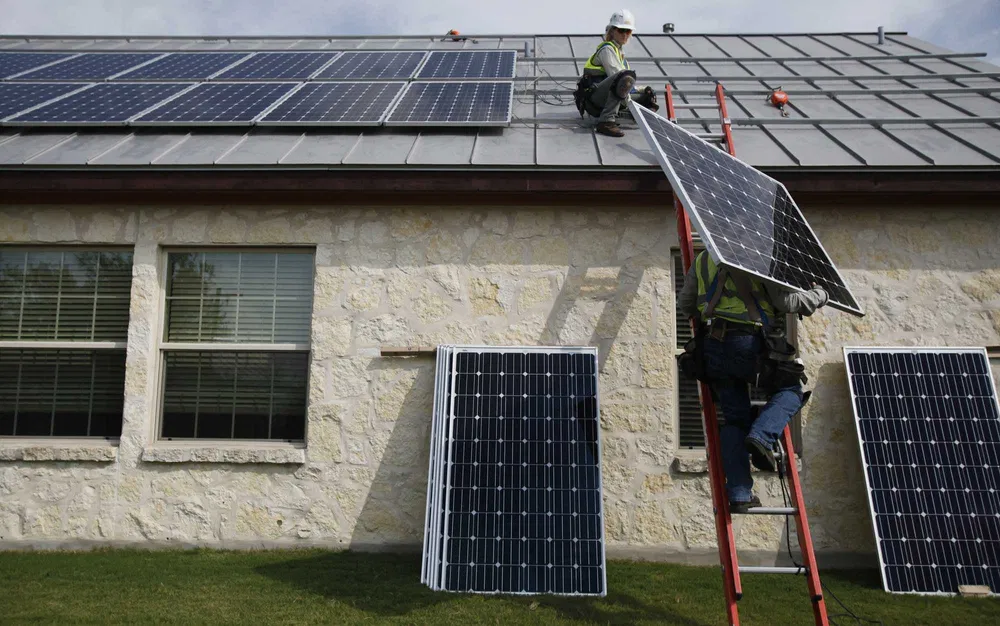
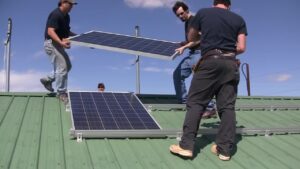
The Leak-Proof Installation Process (how to install solar panels)
— 10 Steps
Step 1: Map Rafter Lines Precisely
Snap horizontal chalk lines marking rafter centers. This ensures every lag bolt hits solid wood, not just sheathing.
Step 2: Pre-Drill & Back-Fill With Sealant
Drill a pilot hole ⅛″ smaller than your lag bolt. Immediately inject tri-polymer sealant into the hole—this back-fills gaps before the bolt enters.
Pro Tip: Skipping back-filling is the #1 cause of micro-leaks that escalate later.
Step 3: Slide Flashing Under Upper Shingle Course
Choose flashing plates designed for your roof pitch. Lift the upper shingle course gently (use a flat bar) and slide flashing so its top edge sits at least 3″ under the shingle. The bottom edge remains exposed to shed water.
Step 4: Seat L-Feet & Torque Lag Bolts Correctly
Place an EPDM rubber washer between L-foot and flashing. Drive the bolt until the washer compresses slightly—about 18 ft-lbs of torque for 5/16″ lag bolts. Over-torquing = crushed washer = leak.
Step 5: Level and Secure Rails
Attach rails to L-feet. Use a laser level; saggy rails twist modules and compromise gasket seals on frame edges.
Step 6: Install Micro-Inverters or DC Optimizers (Optional)
Mount these to rails before panels go on; easier access now keeps you off the roof later. Zip-tie cables but leave drip loops so water falls away from connectors.
Step 7: Populate Modules From Bottom Row Up
Start low, move high. Clamp outer edges first, torque to 10 N·m. Use mid-clamps with integrated ground lugs to bond frames electrically—code requires it.
Step 8: Route Cables Through a Weatherproof Conduit Entry
Drilling a cable pass-through? Install an Oatey solar roof jack or similar flashing boot. Seal with high-temp silicone rated 25 years. Never rely on a loose rubber grommet.
Step 9: Connect to Combiner or Enphase IQ Gateway
Keep junction boxes off the deck; mount them on a raised mounting plate with its own flashing to avoid standing water.
Step 10: Final Water Test & Infrared Scan
Spray the array with a garden hose for five minutes per penetration point. Check attic underside with an infrared (IR) camera; cooler spots may indicate seepage. Catch issues now—before rainy season.
Waterproofing Upgrades Worth Every Naira
Double-Stack Flashing Technique
In high-rain zones, place a second flashing plate upside-down under the first to add a capillary break.
Butyl Tape Bridge
For metal roofs, run 2″ butyl tape across rib valleys before installing S-5 clamps. It seals screw fuzz and metal shavings that might wick water.
Self-Healing Roof Underlayment
If you’re reroofing, choose a self-adhered membrane (e.g., Grace Ice & Water Shield) beneath shingles along the rail rows. Holes from lag bolts self-seal as the membrane warms.
Post-Installation Maintenance Tips
-
Semi-Annual Roof Walk: Tighten any clamp that’s loosened below 8 N·m.
-
Clean Debris Channels: Remove leaves caught behind rails—standing water adds weight and stagnates.
-
Reapply Sealant (If Needed): Inspect lag bolt heads; UV can degrade cheap sealants within 3 years. A quick dab of tri-polymer elongates life.
-
Thermal Imaging Each Spring: Borrow or rent an IR cam to spot moist decking early.
Boosting ROI While Preventing Leaks (how to install solar panels)
Optimize Tilt & Spacing for Cooling
Elevating panels 6″ above roof surface allows airflow, lowering cell temperature by ~5 °C and boosting output up to 3 %. It also keeps moisture from lingering under panels.
Pair With Smart Monitoring (Affiliate Opportunity)
Systems like Sense Solar or Enphase App alert you to production drops that could indicate water damage or panel shading. High buyer intent + CPCs in the ₦1700 ($3+) range—perfect for contextual ads.
Common Mistakes That Lead to Future Leaks
| Mistake | Why It Leaks | Fix |
|---|---|---|
| Reusing old rubber washers | UV-cracked washers shrink and split | Always use new, UV-rated EPDM |
| Pilot holes too large | Excess gap equals water path | Drill 1/8″ smaller than bolt |
| No drip loops on cables | Water travels along wires into attic | Create a U-shaped loop before entry |
| Mounting rails across multiple roof planes | Stress cracks shingles | Keep arrays on a single plane |
Troubleshooting a Leak After Installation
-
Identify the Leak Path
-
Look for water stains above ceiling lines; trace back to roof deck.
-
-
Endoscope Check
-
Insert a 5 mm inspection camera beside lag bolt from attic side to see if sunlight appears (gap = leak).
-
-
Replace Compromised Flashing
-
Unscrew the module row blocking access; swap flashing for a fresh plate and washer.
-
-
Seal & Retest
-
Re-inject sealant, torque, hose-test again.
-
How to Avoid Roof Leakage After a Solar Rooftop Installation
1. Access that roof you want to climb: (how to install solar panels)
You can employ an official carpenter to assess the roof before work begins. The carpenter checks the state of the rooftop to confirm if it can hold the weight of the panels or if it needs repair. If you don’t have a carpenter, you can do this yourself. Just check for weak spots, rust, or signs of wear and tear.
2. Use Sealant or Roof Gum (how to install solar panels)
3. Walk Carefully on the Roof (how to install solar panels)
4. Avoid Creating “Potholes” on the Roof (how to install solar panels)
5. Use Rails for Large Installations (how to install solar panels)
Frequently Asked Questions (how to install solar panels)
How long does a leak-proof solar installation last?
With quality flashing and sealant, penetrations should remain watertight for 25–30 years—the typical life of tier-1 panels.
Can I install solar panels without drilling holes?
Yes, if you have a standing-seam metal roof. Use S-5 clamps that grip seams without penetrations. On tile or shingle roofs, drilling into rafters is unavoidable.
Will my warranty be void if I DIY the install?
Module warranties stay intact, but some roof warranties require certified installers. Check your shingle manufacturer’s fine print.
What’s the best sealant for lag bolts?
Look for a tri-polymer or polyether sealant labeled UV-resistant, service life 30 years, and approved for “wet-on-wet” application. Silicone can shrink over time.
How much weight can my roof handle?
Modern asphalt roofs typically support 20 lbs/ft². A flush-mounted array adds ~3–5 lbs/ft². Still, get a structural engineer’s stamp if snow loads exceed 25 lbs/ft² annually.
Conclusion: Collect Sunshine, Not Rainwater
Installing solar panels is one of the smartest financial moves you can make—especially with electricity rates climbing. But the real win is doing it once and doing it right so you never trade lower bills for ceiling stains. Follow the step-by-step process above, invest in quality flashing and sealants, and commit to simple maintenance. Your reward? Decades of clean energy, a dry attic, and a home that’s truly future-proof.
Ready to turn sunlight into savings without leaks? Grab a roof-ready solar mounting kit or book a vetted installer through our partners today and start your leak-proof solar journey.